News » SolarNode digital IO counting virtual meter
Recently we came across a project needing to track a counter from a proximity sensor that was
connected as a digital IO on a SolarNode. The proximity sensor was reading a bit of machinery that
operated in cycles, and the goal was to count the number of cycles witnessed. The sensor would
normally read as 0, then switch to 1 when activated and stay there for several seconds, then go
back to 0 when the cycle completed. To complicate the matter slightly, if the cycle started but
then completed too quickly, it was not to be counted as a valid cycle.
We can visualise the desired outcome in a table, showing the proximity sensor value over time with the desired output count:
| Time (mm:ss) | Sensor Value | Output Count | Description |
|---|---|---|---|
00:00 |
0 |
0 |
Starting with the sensor “off” |
00:02 |
0 |
0 |
Another reading, still “off” so the count does not change. |
00:04 |
1 |
0 |
The sensor changed to “on”! The output count does not change yet. |
00:06 |
1 |
0 |
Another reading, still “on” so nothing changes still. |
00:08 |
0 |
1 |
The sensor changed back to “off” for a full cycle: the count goes up. |
00:10 |
0 |
1 |
Still “off” so no additional change. |
00:12 |
1 |
1 |
Back to “on” so we’ve started another cycle… |
00:14 |
0 |
1 |
Back to “off” too quickly: don’t count as a full cycle. |
We could write a new plugin to implement this counting logic, but we also realised that the existing Virtual Meter Datum Filter was flexible enough to accomplish what we needed:
- It already provides support for “remembering” a datum property’s previously seen value. This is needed to know when the proximity sensor state changes.
- It already provides support for turning an instantaneous property into an accumulating (hence, “meter”) style property.
- It already provides support for using an expression to calculate the derived meter value, so in this case the proximity sensor cycle count. Additionally expressions are given the exact amount of time since the previously seen value, so the requirement to not count “too fast” cycles could be implemented.
- It already provides support for only updating the meter when the input value changes, which is exactly what we want to track here.
This blog post describes how we used the Virtual Meter Datum Filter to generate a count of complete proximity sensor cycles, describing all the components used to both integrate with the GPIO device being used and implement the cycle-counting virtual meter.
GPIO serial port
We start with the GPIO integration with SolarNode. This project used a simple serial USB-based GPIO
device made by Numato. The first step, is to configure a Serial port component for the
/dev/ttyAMA0 USB serial device SolarNodeOS provides when the Numato device is connected:
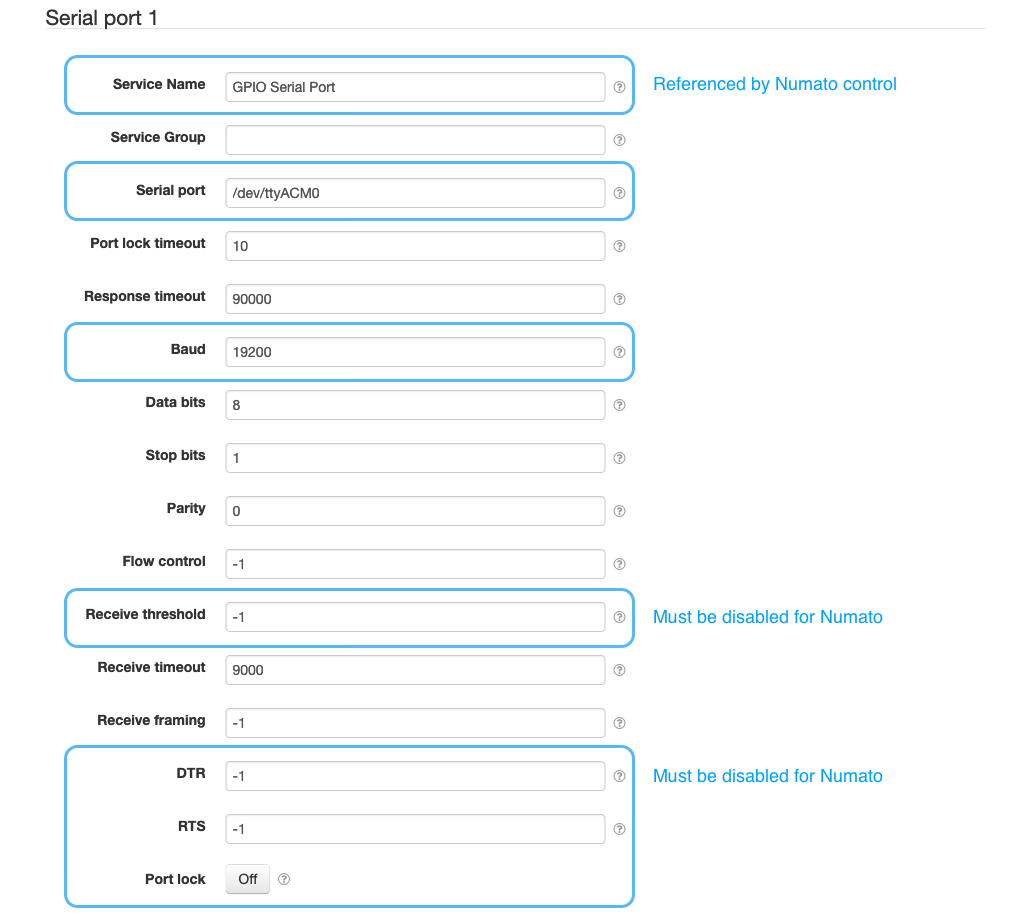
Some of those serial port settings are required by the Numato device to work property with
SolarNode. The Service Name is configured as GPIO Serial Port which we’ll see referred to
later on.
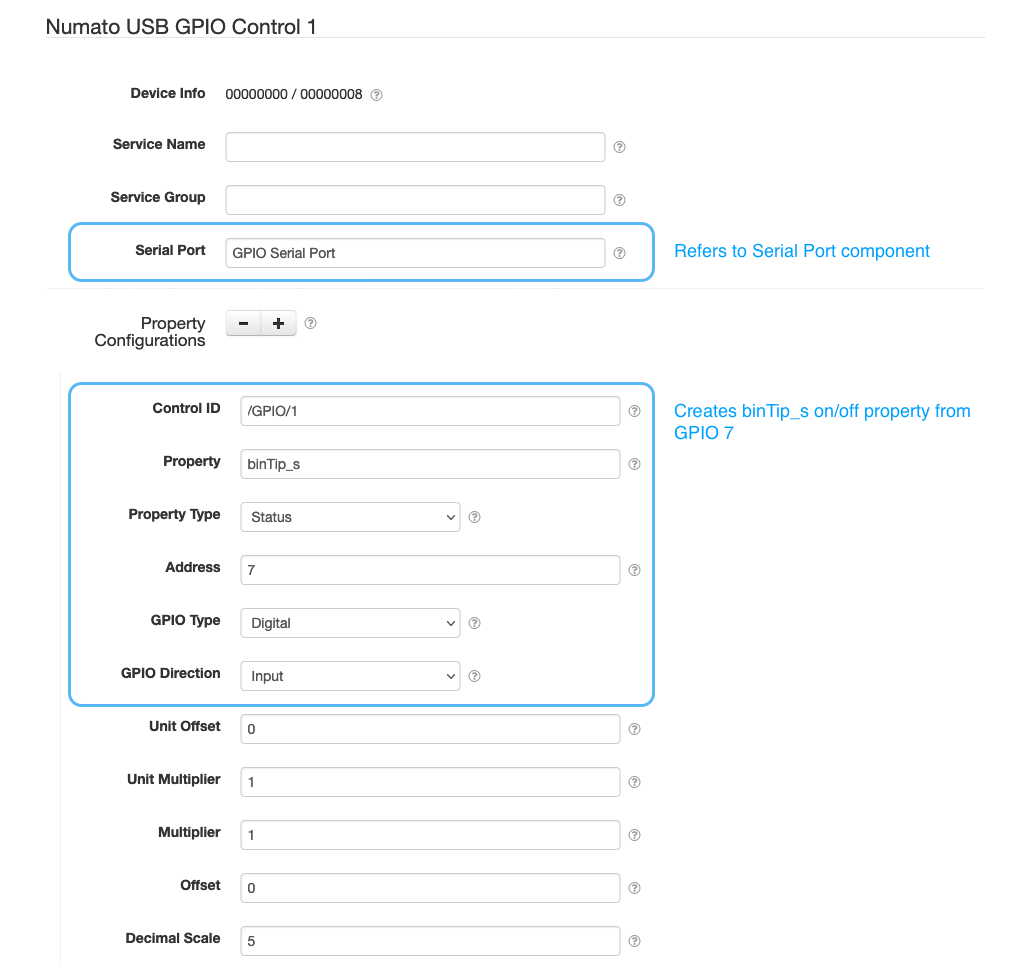
GPIO control
SolarNode supports integrating with Numato USB GPIO device via the Numato USB GPIO
Control plugin. This plugin is used to expose any of the device’s GPIO
connections as a SolarNode Control, so the GPIO state can be read or written to. We have to
configure the Serial Port component name, set previously as GPIO Serial Port, and we give the
control the ID /GPIO/1. The Numato device sports 8 GPIO connections, and the proximity sensor is
connected to GPIO #7. We configure a status property named binTip_s for the control property
name.
GPIO control datum stream
The Numato USB GPIO device must be polled to read the GPIO value, so to turn the control value into a time-based datum stream we configure a Control Datum Source to read the GPIO state every 500ms.
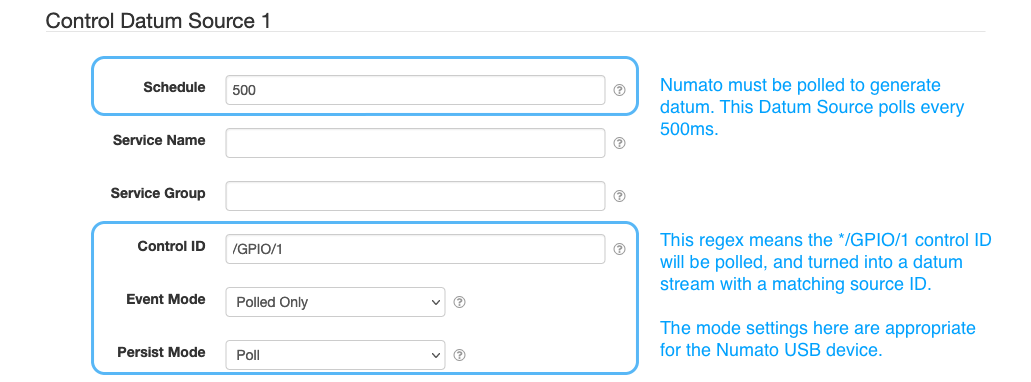
Once this has been configured, SolarNode will start generating a datum stream using the control ID
/GPIO/1 as the datum source ID. Each datum will have a single binTip_s status property with
a 0 or 1 value.
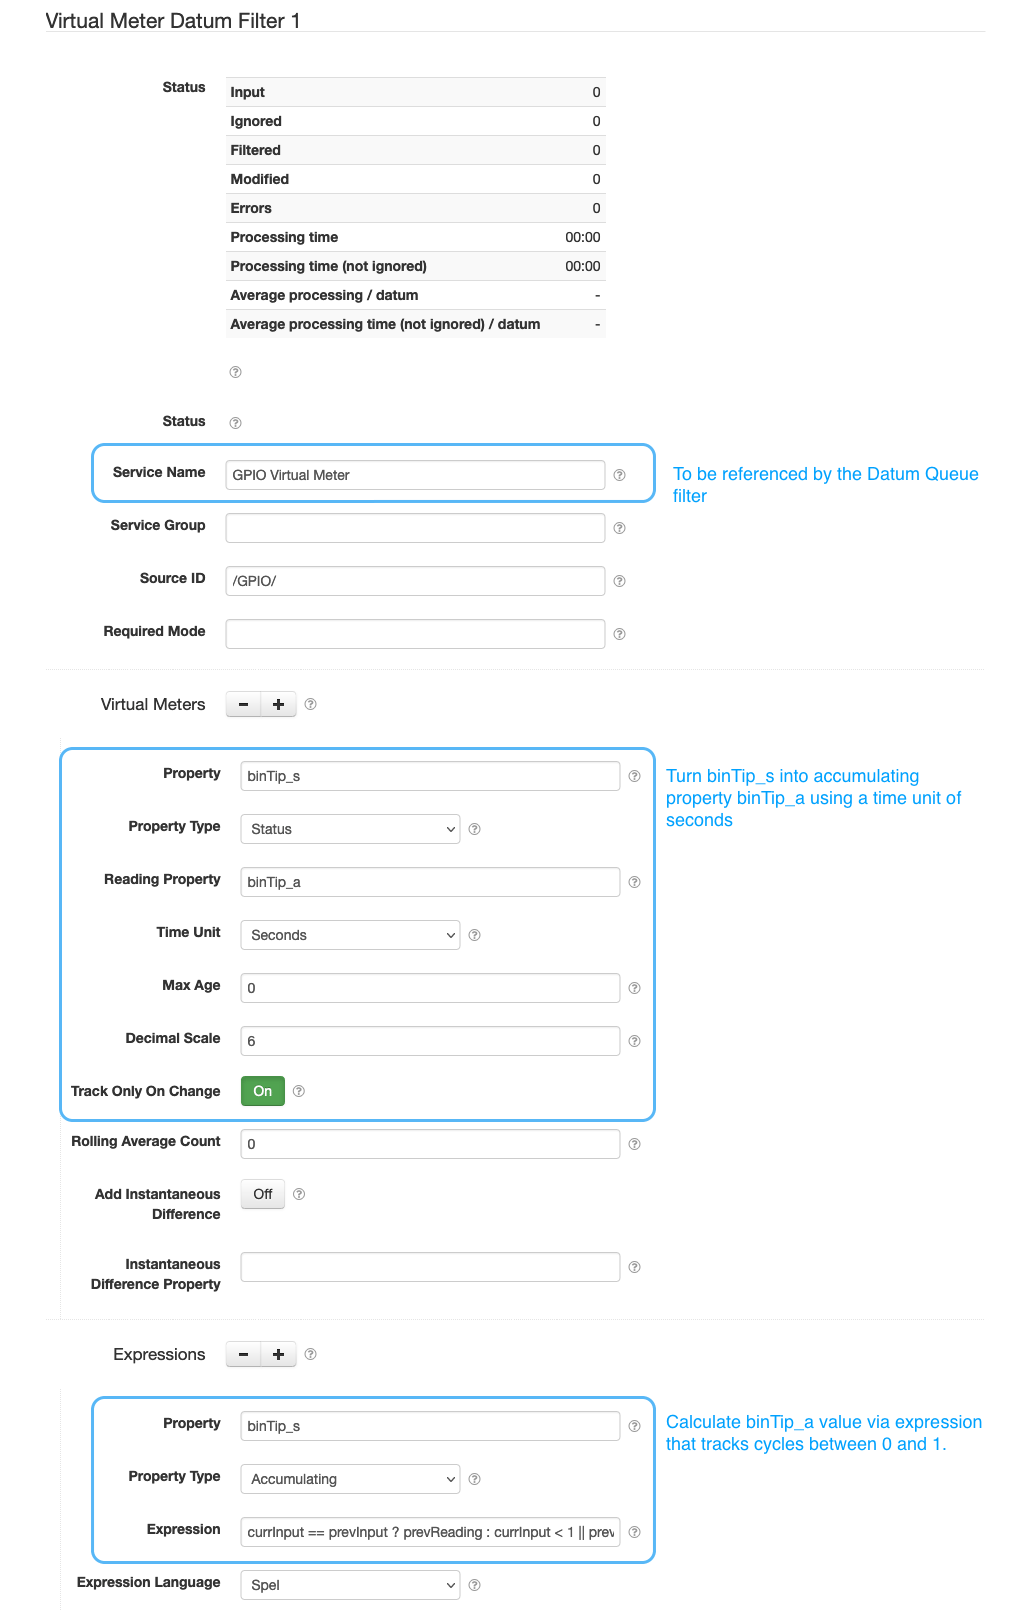
Proximity sensor cycle counting virtual meter
Finally we are ready to configure the Virtual Meter Datum Filter component that will
insert a proximity cycle counting binTip_a accumulating property into the /GPIO/1 datum
stream. The Service Name is configured as GPIO Virtual Meter which will need to be referred to
by the Datum Queue Datum Filter setting, either directly or via an indirect Filter Chain. The
important settings for this Virtual Meter are:
| Setting | Value | Description |
|---|---|---|
| Source ID | /GPIO/1 |
The source ID to apply the virtual meter filter to. |
| Property | binTip_s |
The input property to the virtual meter. |
| Reading Property | binTip_a |
The name of the generated accumulating counter property. |
| Time Unit | Seconds |
Using seconds means the timeUnits parameter available in our expression will be expressed in seconds. |
| Track Only On Change | On | This is enabled so our expression is only evaluated when the binTip_s input property changes. |
The expression settings that go along with this are:
| Setting | Value | Description |
|---|---|---|
| Property | binTip_a |
Must match the output property we want to apply the expression to. |
| Property Type | Accumulating |
Must be accumulating for the meter output value. |
| Expression | See below for details. |
Cycle counting virtual meter expression
The expression used to calculate the binTip_a accumulating property is designed to deal with input
readings of 0 or 1, where the desire is to count the number of toggles from 0 → 1 → 0 that
take more than 5s to complete. The expression relies on the Track Only On Change setting to be
active. That means the prevInput value is always the last changed input value, not necessarily
the previously seen input value!
To help deal with various edge cases where SolarNode might start up or shut down in the middle of a cycle, the idea of partially advancing the meter a fractional amount is used, with rounding then used to either advance or rollback the meter to nice whole numbers. Using the sensor reading example table from before, the actual output of this meter would be:
| Time (mm:ss) | Sensor Value | Output Count | Description |
|---|---|---|---|
00:00 |
0 |
0 |
Starting with the sensor “off” |
00:02 |
0 |
0 |
Another reading, still “off” so the count does not change. |
00:04 |
1 |
0.1 |
The sensor changed to “on”! The output count partially advances. |
00:06 |
1 |
0.1 |
Another reading, still “on” so nothing changes here. |
00:08 |
0 |
1 |
The sensor changed back to “off” for a full cycle: the count rounds up. |
00:10 |
0 |
1 |
Still “off” so no additional change. |
00:12 |
1 |
1.1 |
Back to “on” so we’ve started another cycle… |
00:14 |
0 |
1 |
Back to “off” too quickly: revert by rounding down. |
The expression logic can be boiled down to these rules:
- If the input is the same as the last CHANGE, do nothing.
- If the input has changed to
1, add0.1. - If the input has changed and the last CHANGE is a whole number, add
0.1. - If the time since the last CHANGE is less than 5s, round the reading DOWN to a whole number, otherwise round the reading UP.
These rules have these general effects:
- The meter “partially” advances whenever the input changes to
1; it needs to change back to0to “fully” advance. - The meter “fully” advances when the input changes to
0, as long as the duration of time spent at1was 5s or more.
The expression can be translated into the following pseudo code:
 IF ( input has not changed ) THEN
    reading does not change
 ELSE IF ( input is 1 OR reading is a whole number ) THEN
    add 0.1 to reading
 ELSE IF ( time since last change is less than 5s ) THEN
    round reading down
 ELSE
    round meter up
 END IF
The actual expression (in SolarNode this is written in the Spring Expression Language) is the following:
currInput == prevInput
  ? prevReading                              // reading has not changed
  : currInput > 0 || prevReading.stripTrailingZeros().scale() <= 0
    ? prevReading + 0.1                      // reading went to 1
    : prevReading.setScale(0, timeUnits < 5  // timeUnits is in seconds
      ? T(java.math.RoundingMode).DOWN       // too quick, round down
      : T(java.math.RoundingMode).UP)        // valid cycle, round up
Conclusion
This post packs in a lot of information and hopefully shows how flexible SolarNode can be with handling data from sensors and performing some local calculations to help derive useful information from the data being collected.